Chromatic for React Native (early access)
Chromatic enables you to visual test iOS and Android apps built with React Native. It’s powered by React Native for Storybook, and your stories act as test cases.
Chromatic captures snapshots in the iOS Simulator on hosted macOS and the Android Emulator on hosted Linux, so you test exactly what your users see.
🚧 Early access: React Native support is currently in early access. If you’re interested in trying it out, request access here.
Prerequisites
Before you start, make sure you have:
- A working React Native app (Expo, Expo Router, React Native CLI, and Re.Pack are all supported)
- React Native for Storybook installed and running locally, v9.0 or higher
- A Chromatic account
Don’t have Storybook for React Native set up yet?
Use the Storybook CLI to get started. It handles all the set up: it wraps your bundler config with withStorybook, generates the Storybook entry point, and adds convenience scripts to your package.json.
npm create storybook@latestSet up Chromatic for React Native
The Chromatic CLI uploads your built React Native Storybook to the Chromatic cloud, where it runs on real iOS Simulator and Android Emulator instances and produces visual diffs against your baselines.
1. Sign up and create a new project
Generate a unique project token for your app by signing in to Chromatic and creating a project. Sign in with your GitHub, GitLab, Bitbucket, or email.
Then reach out to your point of contact at Chromatic to enable React Native support for your project.
How to setup Chromatic if you require SSO, on-premises, or have a different Git provider.
“Unlinked” projects are the way to go if you use an OAuth provider or Git host that Chromatic doesn’t support yet, or if you need an enterprise plan but wish to trial Chromatic with your project first.
To set up Chromatic with an “unlinked” project:
- Make sure your code is in a local or self-hosted repository (Chromatic uses Git history to track baselines).
- Sign in via any of the supported providers, and make sure you’re on your personal account. This authenticates your profile only; it doesn’t link the project to your Git provider.
- Select “Create a project” and type your project name to create an unlinked project.
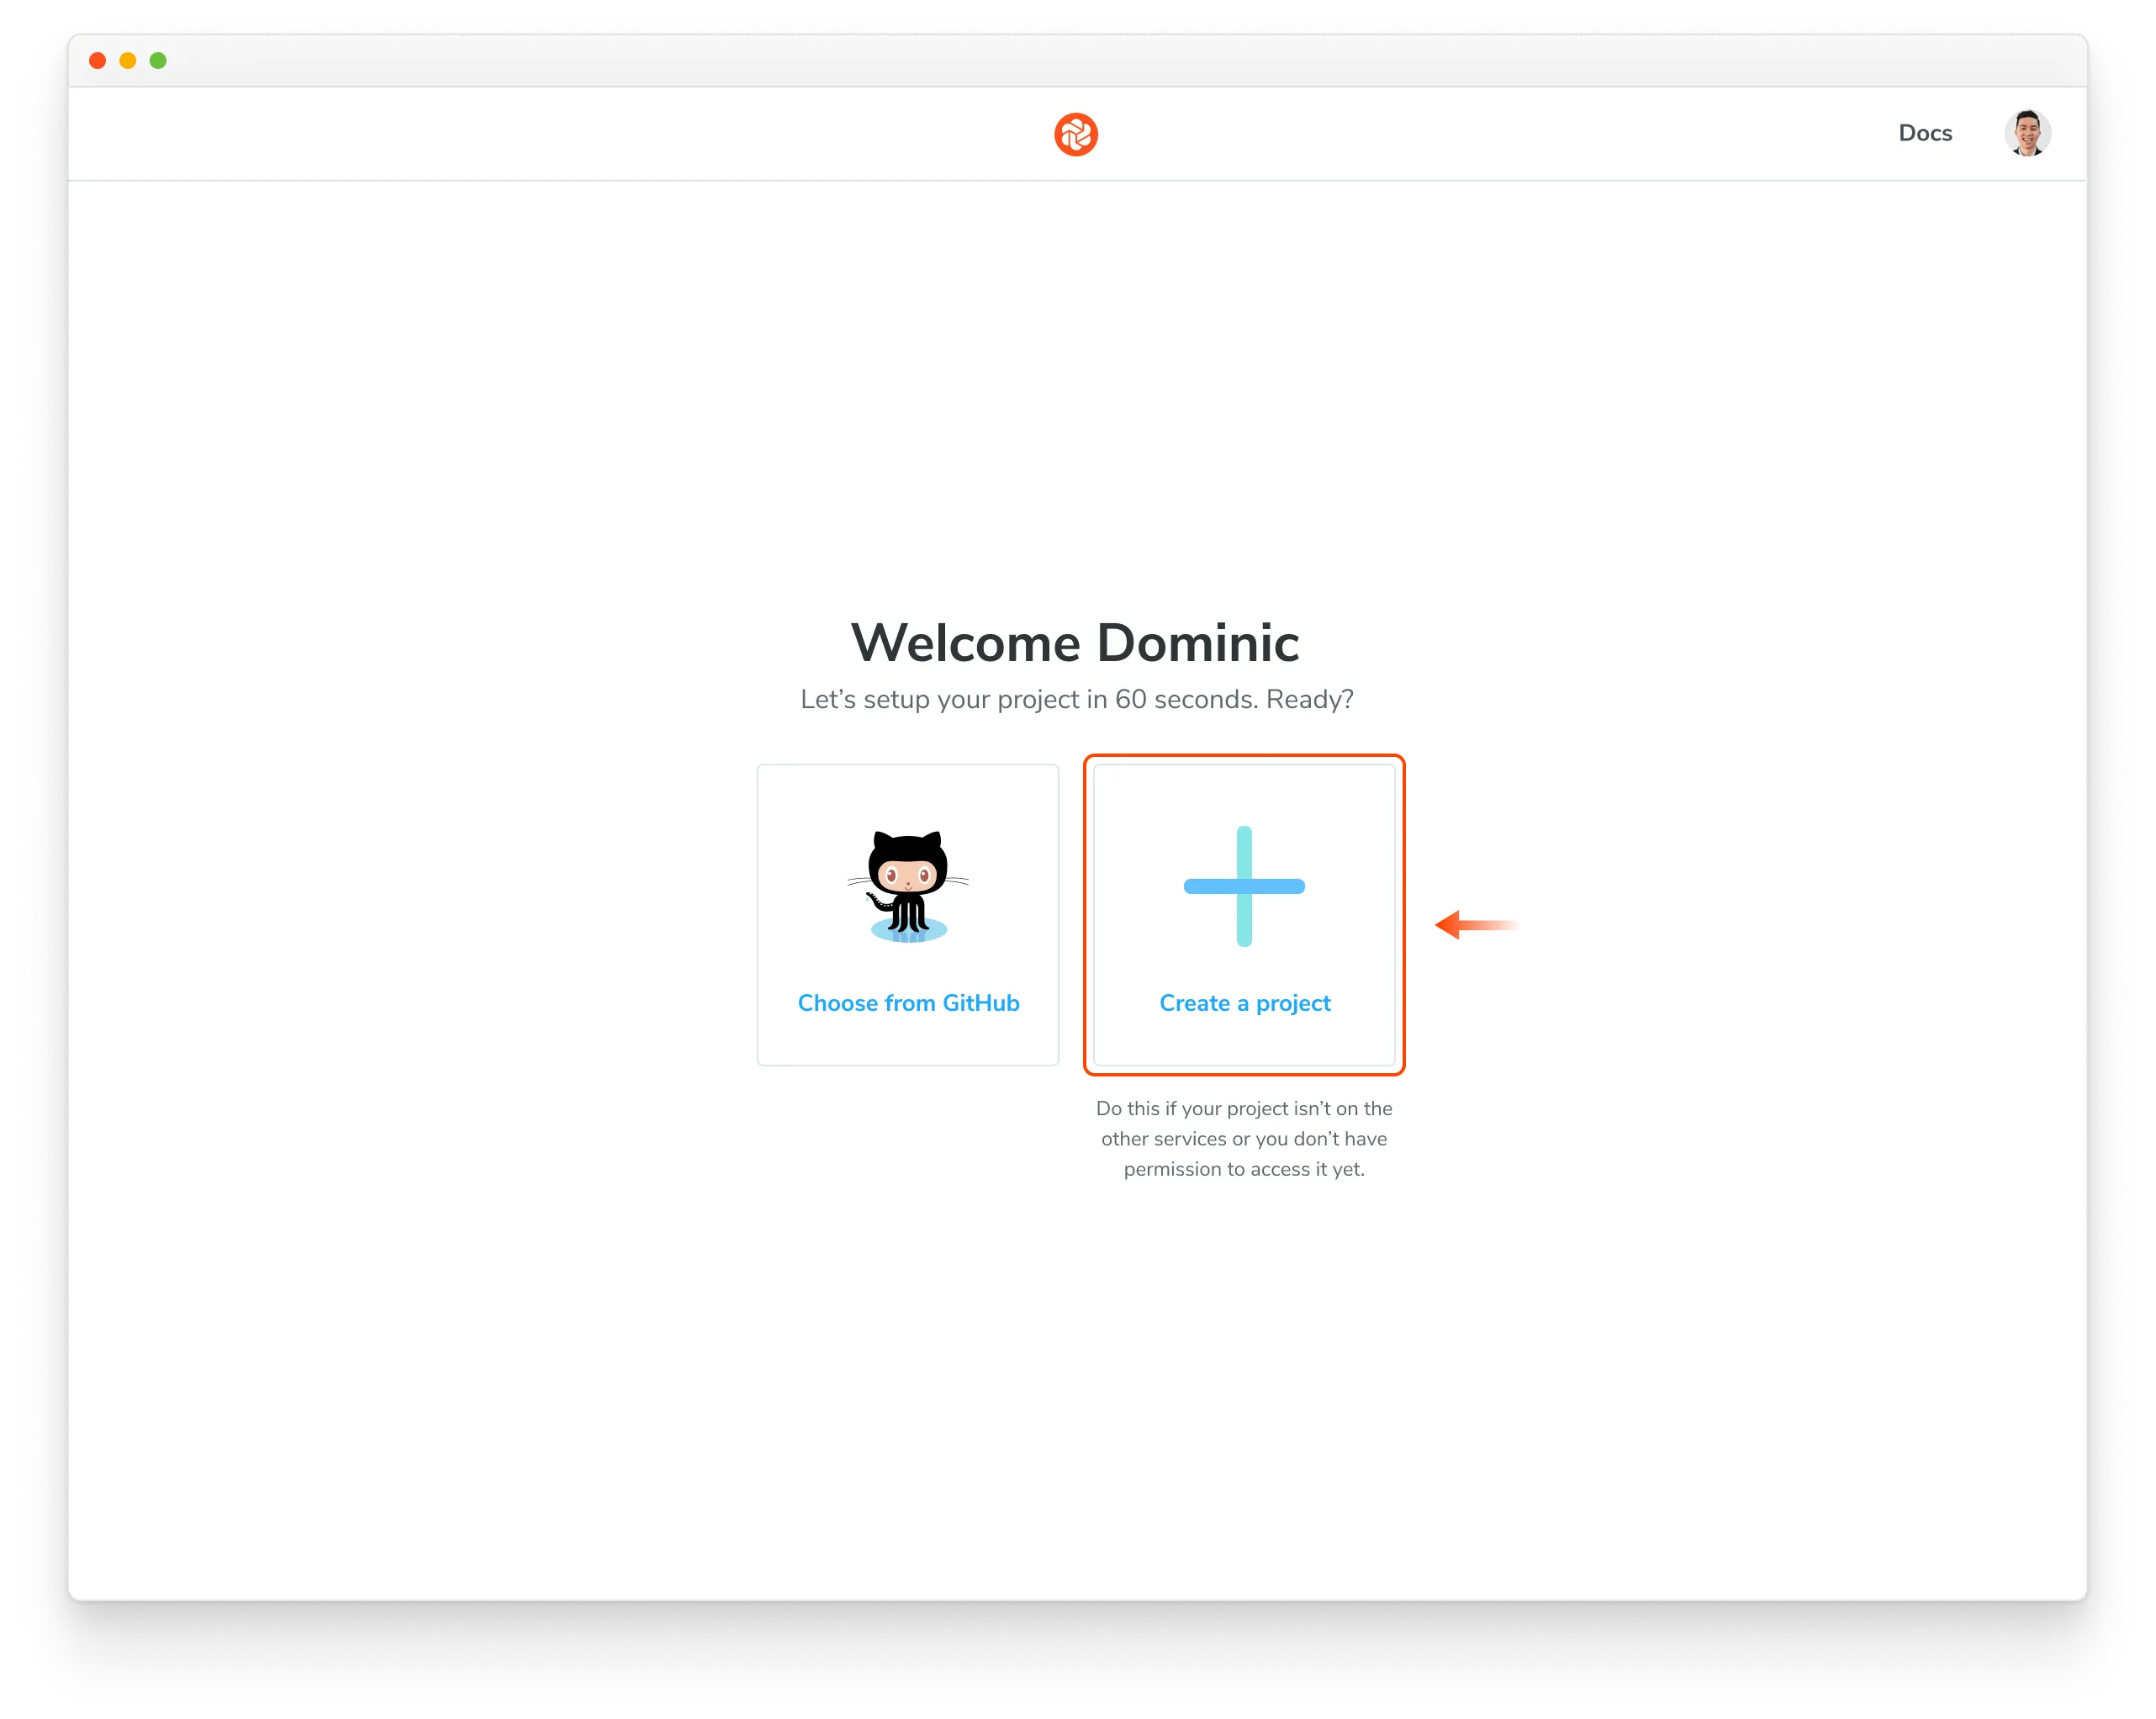
Nice! You created an unlinked project. This will allow you to get started with UI Testing workflow regardless of the underlying git provider. You can then configure your CI system to automatically run a Chromatic build on push.
The Chromatic CLI provides the option to generate a JUnit XML report of your build, which you can use to handle commit/pull request statuses yourself. For details, see the configuration reference options.
Unlinked projects have certain drawbacks:
- You won’t get automatic PR checks, so pull requests will not be marked with our status messages. You’ll need to set this up manually via your CI provider.
- Authentication and access control must be handled manually through user invites.
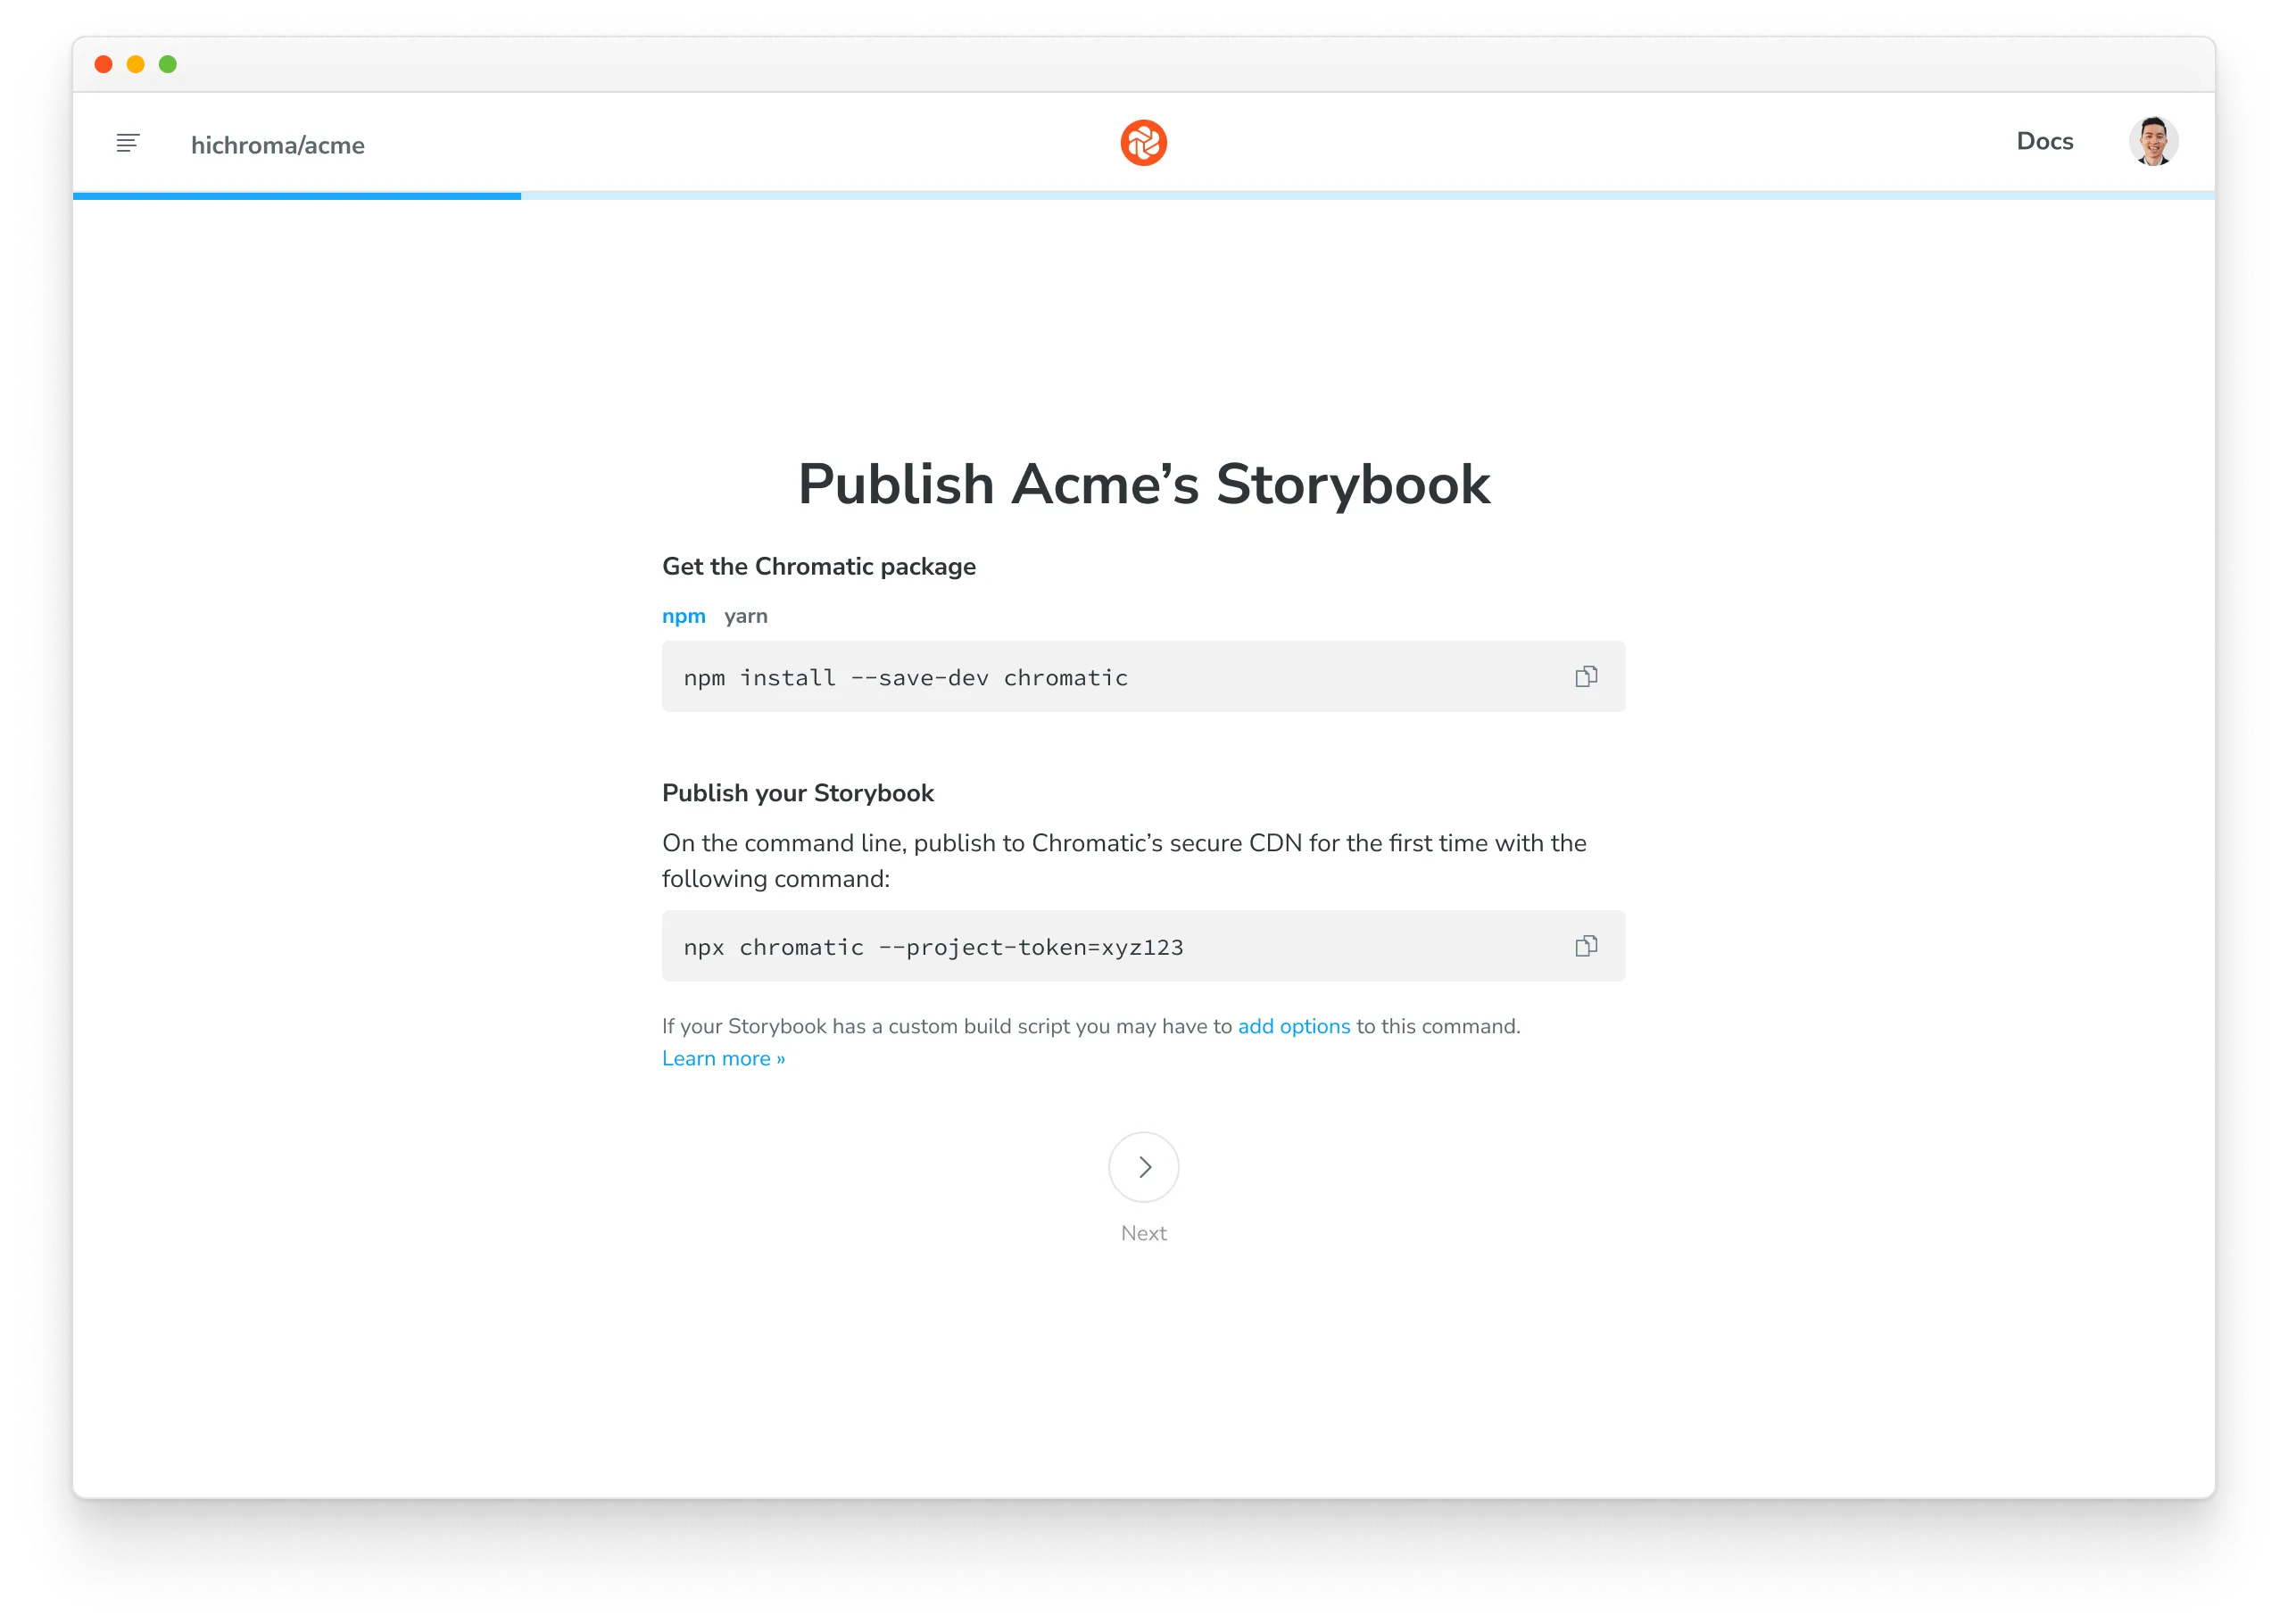
If you bootstrapped a new React Native Storybook with v10.4+, Steps 2 and 3 aren’t required. When initializing a new project with v10.4+, Storybook handles all configuration automatically.
2. Ensure the root shows Storybook
Regardless of which router your project uses, you must return <StorybookUI /> at the app’s root when STORYBOOK_ENABLED or EXPO_PUBLIC_STORYBOOK_ENABLED is set.
For example, in app/_layout.tsx, you can conditionally render Storybook based on the environment variable:
import { Stack } from 'expo-router';
import StorybookUI from '../.rnstorybook';

export default function RootLayout() {
  if (process.env.EXPO_PUBLIC_STORYBOOK_ENABLED === 'true') {
    return (
      <ThemeProvider value={colorScheme === 'dark' ? DarkTheme : DefaultTheme}>
        <StorybookUI />
      </ThemeProvider>
    );
  }

  // else render the normal app
  return (
    <Stack screenOptions={{ headerShown: false }}>
      <Stack.Screen name="(pages)/index" />
    </Stack>
  );
}
3. Configure Storybook UI using environment variables
Chromatic drives React Native Storybook via WebSockets and requires a few additional options to be enabled. These options must be controlled by environment variables read in .rnstorybook/index.ts.
import { view } from './storybook.requires';

const StorybookUIRoot = view.getStorybookUI({
  enableWebsockets: process.env.EXPO_PUBLIC_STORYBOOK_ENABLED === 'true',
  host: process.env.EXPO_PUBLIC_STORYBOOK_WEBSOCKET_HOST || 'localhost',
  port: parseInt(process.env.EXPO_PUBLIC_STORYBOOK_WEBSOCKET_PORT || '7007', 10),
  secured: process.env.EXPO_PUBLIC_STORYBOOK_WEBSOCKET_SECURED === 'true',
  onDeviceUI: process.env.EXPO_PUBLIC_STORYBOOK_DISABLE_UI !== 'true',
});

export default StorybookUIRoot;
4. Run your first build to establish baselines
Once you have a project token, you can establish baselines by running a Chromatic build for a new project. Chromatic builds your Storybook app, uploads it, captures a snapshot of each story, and sets those snapshots as the baseline.
Subsequent builds will generate new snapshots that are compared against existing baselines to detect UI changes.
npx chromatic --project-token <your-project-token>yarn chromatic --project-token <your-project-token>pnpm chromatic --project-token <your-project-token>The Chromatic CLI will build your Storybook .apk and/or .app for Expo based projects.
If you have a custom build process, you can also build the artifacts yourself and pass the directory to chromatic with the --storybook-build-dir flag. More on that in the advanced configuration docs.
5. Review changes
On each build, Chromatic compares new snapshots to existing baselines from previous builds. Try modifying a component a bit and running another Chromatic build.
When tests are complete, you’ll see the build status and a link to review the changes. Click on that link to open Chromatic.
Build 2 published.

View it online at https://www.chromatic.com/build?appId=...&number=2.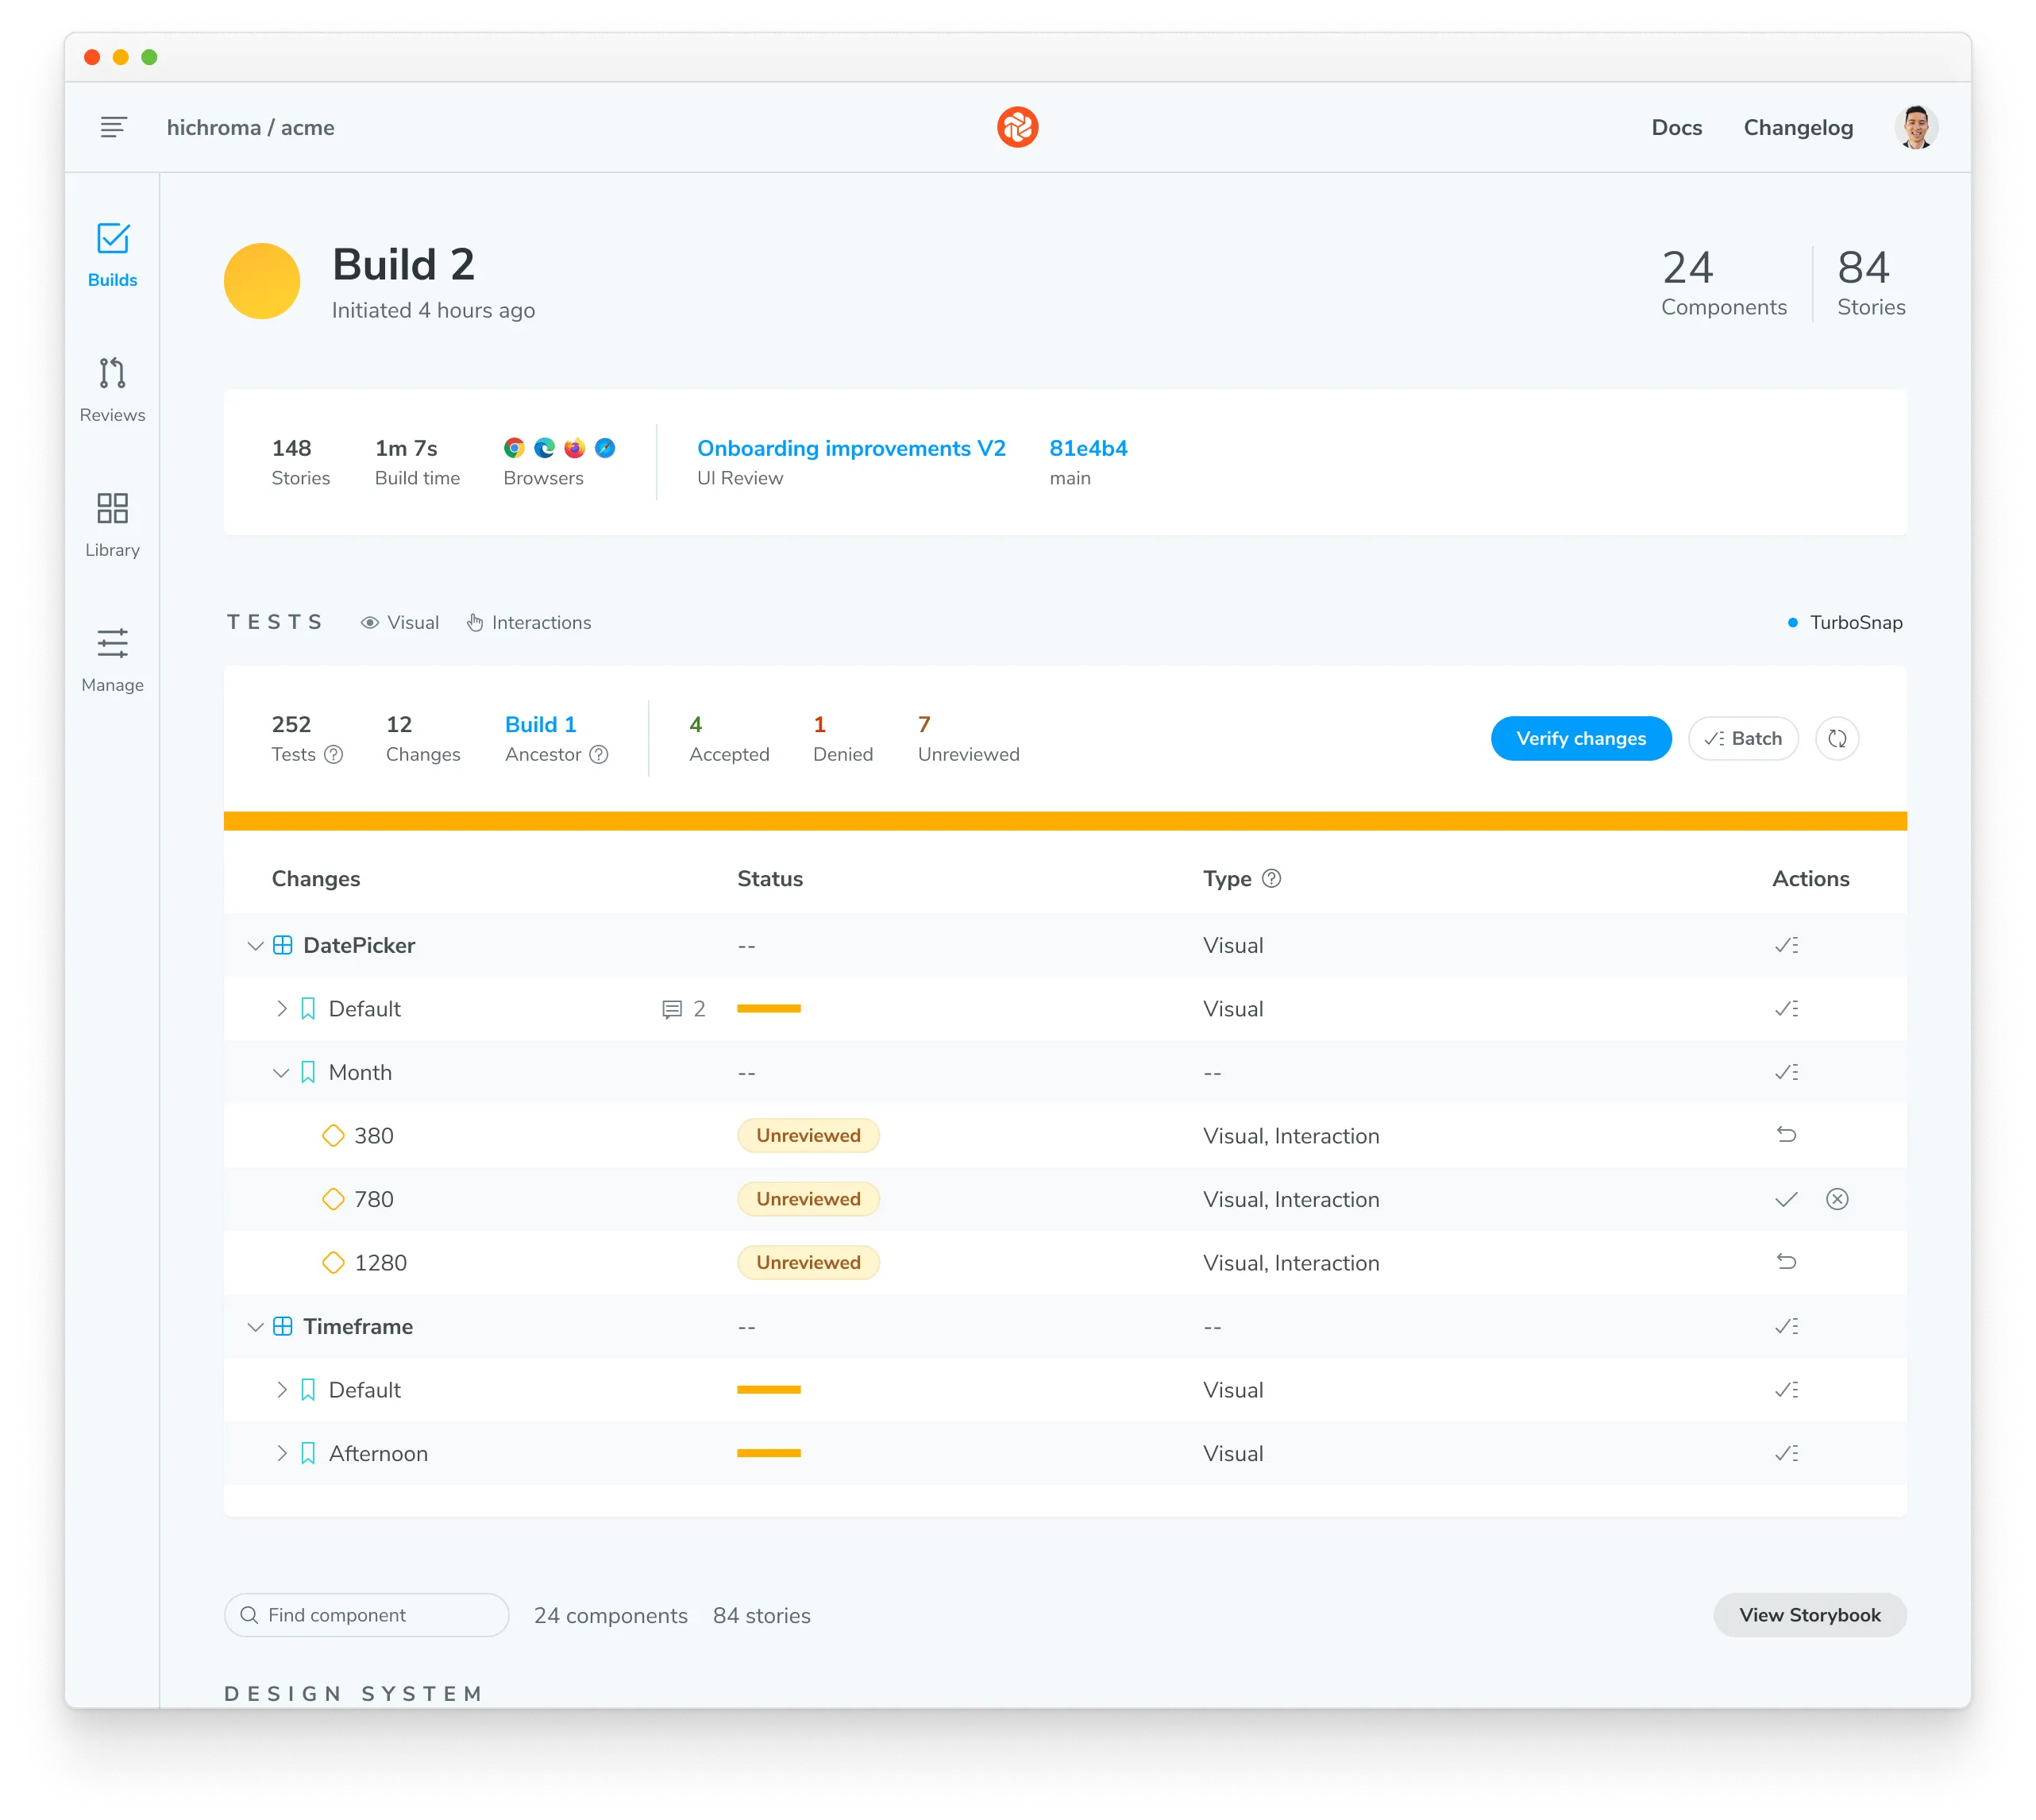
The build will be marked “unreviewed” and the changes will be listed in the “Tests” table. Go through each snapshot to review the diff and approve or reject the change.
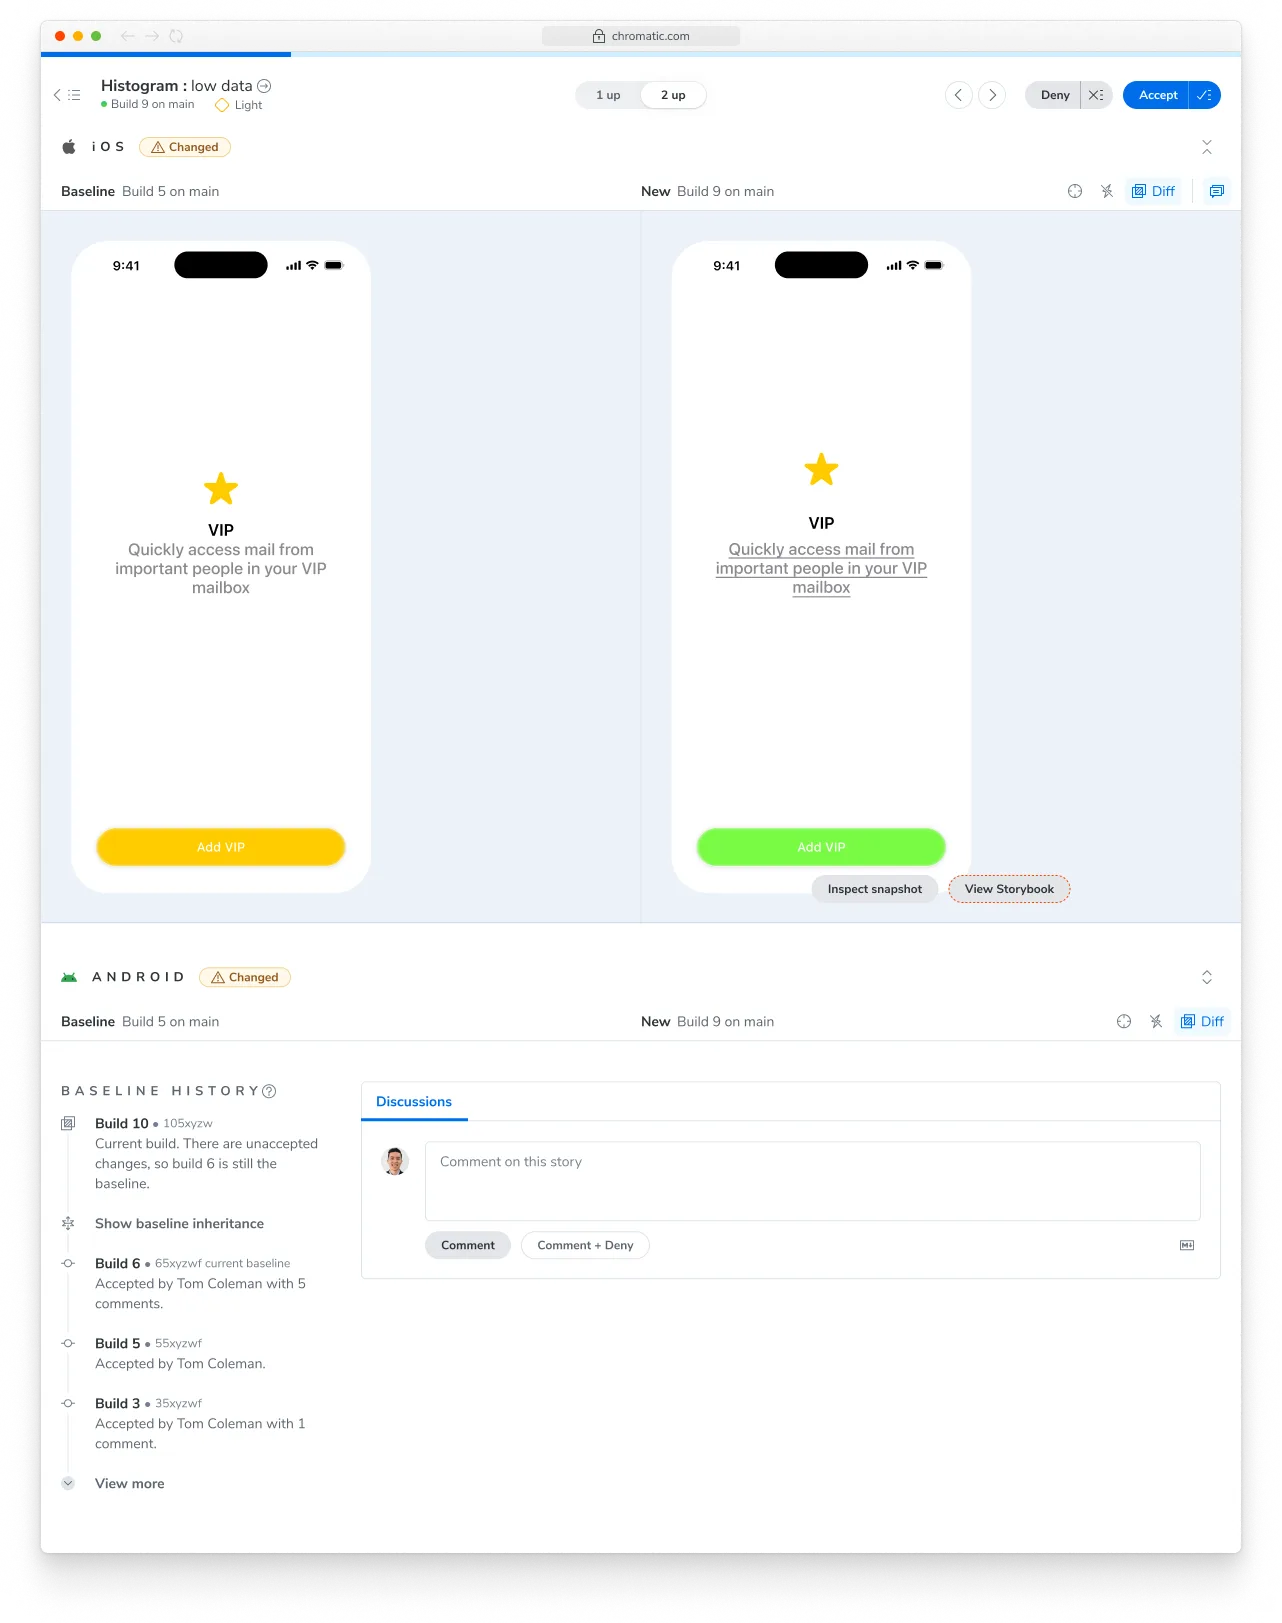
✅ Accept change: This updates the story baseline, ensuring future snapshots are compared against the latest approved version. Once a snapshot is accepted, it won’t need re-acceptance until it changes, even across git branches or merges.
❌ Deny change: This marks the change as “denied”, indicating a regression and immediately failing the build. You can deny multiple changes per build. Denying a change will force a re-capture on the next build.
Advanced configuration options
Environment Variables
All build commands invoked by the Chromatic CLI set environment variables to properly configure your Storybook for visual testing. These environment variables let you control Storybook behavior without changing code, as documented here.
The Chromatic CLI sets the following environment variables. It also sets them with the EXPO_PUBLIC_ prefix for use with Expo.
| Name | Value | Description |
|---|---|---|
STORYBOOK_ENABLED | true | Enables Storybook in bundle |
STORYBOOK_DISABLE_UI | true | Disables the Storybook manager UI |
STORYBOOK_SERVER | false | Do not start the channel server. |
STORYBOOK_WEBSOCKET_HOST or STORYBOOK_WS_HOST | react-native.capture.chromatic.com | Connects the Storybook to Chromatic capture systems. |
STORYBOOK_WEBSOCKET_PORT or STORYBOOK_WS_PORT | 7007 | Connects the Storybook to Chromatic capture systems. |
STORYBOOK_WEBSOCKET_SECURED or STORYBOOK_WS_SECURED | true | Ensures the use of TLS when connecting to Chromatic. |
Custom build commands
For non-Expo users or setups Chromatic doesn’t currently account for, two escape-hatch options are available via the config file:
When set, the CLI invokes these commands instead of its defaults. The commands must output artifacts named storybook.apk and/or storybook.app to the directory specified by CHROMATIC_ARTIFACT_DIRECTORY.
Reusing an existing build
Pass --storybook-build-dir to skip all build steps except manifest.json generation. This is most useful for parallelizing native builds across CI machines: one machine builds the Android artifact, another builds the iOS artifact, and a third runs Chromatic with --storybook-build-dir pointing to the directory containing both artifacts.
The react-native-build command for Expo users
The CLI includes a react-native-build sub-command for building your React Native app that use Expo. It uses the same logic as a regular Chromatic run, but lets you split your CI pipeline and parallelize Android and iOS builds.
npx chromatic@latest react-native-build --help

  Build React Native Storybook for Chromatic

  Usage
    chromatic react-native-build [options]

  Options
    --platform    Platform to build (android, ios). Can be specified multiple times. Defaults to all platforms in Expo config.
    --output-dir  Directory to write build artifacts and log file to.
Configure CI
Integrate Chromatic into your CI pipeline to get notified about any visual changes introduced by a pull request. Chromatic will run tests when you push code and report changes via the “UI Tests” badge for your pull request.
Here’s a sample GitHub Actions workflow (for Expo) that builds the Storybook app for iOS and Android in parallel, then runs Chromatic with the generated artifacts:
name: Build

on:
  pull_request:
    types: [opened, edited, synchronize]
  push:
    branches:
      - main

jobs:
  build-ios:
    runs-on: macos-latest
    steps:
      - name: Checkout
        uses: actions/checkout@v7
        with:
          fetch-depth: 0
      - name: Select Xcode
        run: sudo xcode-select -s /Applications/Xcode_26.3.app
      - name: Setup Node.js
        uses: actions/setup-node@v7
        with:
          node-version: 24.20.0
          cache: npm
      - name: Install dependencies
        run: npm ci
      - name: Cache CocoaPods spec repo
        uses: actions/cache@v6
        with:
          path: ~/.cocoapods
          key: cocoapods-specs-${{ hashFiles('package.json', 'app.json') }}
          restore-keys: |
            cocoapods-specs-
      - name: Cache Pods directory
        uses: actions/cache@v6
        with:
          path: ios/Pods
          key: ios-pods-${{ hashFiles('package.json', 'app.json') }}
          restore-keys: |
            ios-pods-
      - name: Build iOS
        run: npx --yes chromatic react-native-build --platform=ios --output-dir=build
      - name: Upload iOS build
        uses: actions/upload-artifact@v7
        with:
          name: ios-build
          path: build/
          retention-days: 1

  build-android:
    runs-on: ubuntu-latest
    steps:
      - name: Checkout
        uses: actions/checkout@v7
        with:
          fetch-depth: 0
      - name: Setup Node.js
        uses: actions/setup-node@v7
        with:
          node-version: 24.20.0
          cache: npm
      - name: Cache Gradle wrapper
        uses: actions/cache@v6
        with:
          path: ~/.gradle/wrapper
          key: gradle-wrapper-${{ hashFiles('package.json', 'app.json') }}
      - name: Cache Gradle dependencies
        uses: actions/cache@v6
        with:
          path: ~/.gradle/caches
          key: gradle-caches-${{ hashFiles('package.json', 'app.json') }}
          restore-keys: |
            gradle-caches-
      - name: Cache Android directory
        uses: actions/cache@v6
        with:
          path: android/
          key: android-dir-${{ hashFiles('package.json', 'app.json') }}
          restore-keys: |
            android-dir-
      - name: Install dependencies
        run: npm ci
      - name: Build Android
        run: npx --yes chromatic react-native-build --platform=android --output-dir=build
      - name: Upload Android build
        uses: actions/upload-artifact@v7
        with:
          name: android-build
          path: build/
          retention-days: 1

  chromatic:
    needs: [build-ios, build-android]
    runs-on: ubuntu-latest
    steps:
      - name: Checkout
        uses: actions/checkout@v7
        with:
          fetch-depth: 0
      - name: Setup Node.js
        uses: actions/setup-node@v7
        with:
          node-version: 24.20.0
          cache: npm
      - name: Install dependencies
        run: npm ci
      - name: Download iOS build
        uses: actions/download-artifact@v8
        with:
          name: ios-build
          path: build/ios
      - name: Download Android build
        uses: actions/download-artifact@v8
        with:
          name: android-build
          path: build/android
      - name: Move Storybook static files
        run: |
          mkdir -p storybook-static
          mv build/ios/storybook.app storybook-static/
          mv build/android/storybook.apk storybook-static/
      - name: Publish to Chromatic
        run: npx --yes chromatic -d storybook-static --exit-zero-on-changes --exit-zero-on-errors
        env:
          CHROMATIC_PROJECT_TOKEN: ${{ secrets.CHROMATIC_PROJECT_TOKEN }}
Configure CI with EAS Build
If you already build with EAS Build, you can build the Storybook artifacts on EAS instead of on GitHub-hosted runners, keeping your credentials and build profiles in one place.
This is a two-part setup: an EAS workflow builds the iOS .app and Android .apk artifacts in parallel, then triggers a GitHub Actions workflow that downloads them and runs Chromatic.
1. Add a Storybook build profile
Both platform builds use a dedicated storybook build profile so the artifacts contain Storybook instead of your app. In eas.json, enable Storybook in the bundle and produce artifacts Chromatic can install—an iOS Simulator build and an Android APK:
{
  "build": {
    "storybook": {
      "ios": {
        "simulator": true
      },
      "android": {
        "buildType": "apk"
      },
      "env": {
        "EXPO_PUBLIC_STORYBOOK_ENABLED": "true"
      }
    }
  }
}
2. Build artifacts and trigger the GitHub workflow
The EAS workflow builds both platforms, then uses the build IDs to trigger the Chromatic workflow on GitHub Actions via a repository dispatch.
name: Chromatic

on:
  push:
    branches: ['main']
  pull_request:
    branches: ['*']

jobs:
  build_ios:
    name: Build iOS Storybook
    type: build
    params:
      platform: ios
      profile: storybook
  build_android:
    name: Build Android Storybook
    type: build
    params:
      platform: android
      profile: storybook

  trigger_chromatic:
    name: Trigger Chromatic on GitHub Actions
    needs: [build_ios, build_android]
    steps:
      - name: Dispatch chromatic-eas workflow
        # 👇 Replace `<owner>/<repo>` with your repository.
        run: |
          curl --fail-with-body -sS -X POST \
            -H "Accept: application/vnd.github+json" \
            -H "Authorization: Bearer ${GH_DISPATCH_TOKEN}" \
            "https://api.github.com/repos/<owner>/<repo>/actions/workflows/chromatic-eas.yml/dispatches" \
            -d "{
              \"ref\": \"${{ github.ref_name || 'main' }}\",
              \"inputs\": {
                \"ios_build_id\": \"${{ needs.build_ios.outputs.build_id }}\",
                \"android_build_id\": \"${{ needs.build_android.outputs.build_id }}\"
              }
            }"
The build_ios and build_android jobs each expose a build_id output. The trigger_chromatic job passes those IDs to the GitHub workflow as inputs so it knows which artifacts to download.
GH_DISPATCH_TOKEN is a GitHub personal access token with workflow scope, both read and write. Store it as an EAS environment variable (marked secret) so the workflow can authenticate the dispatch request.
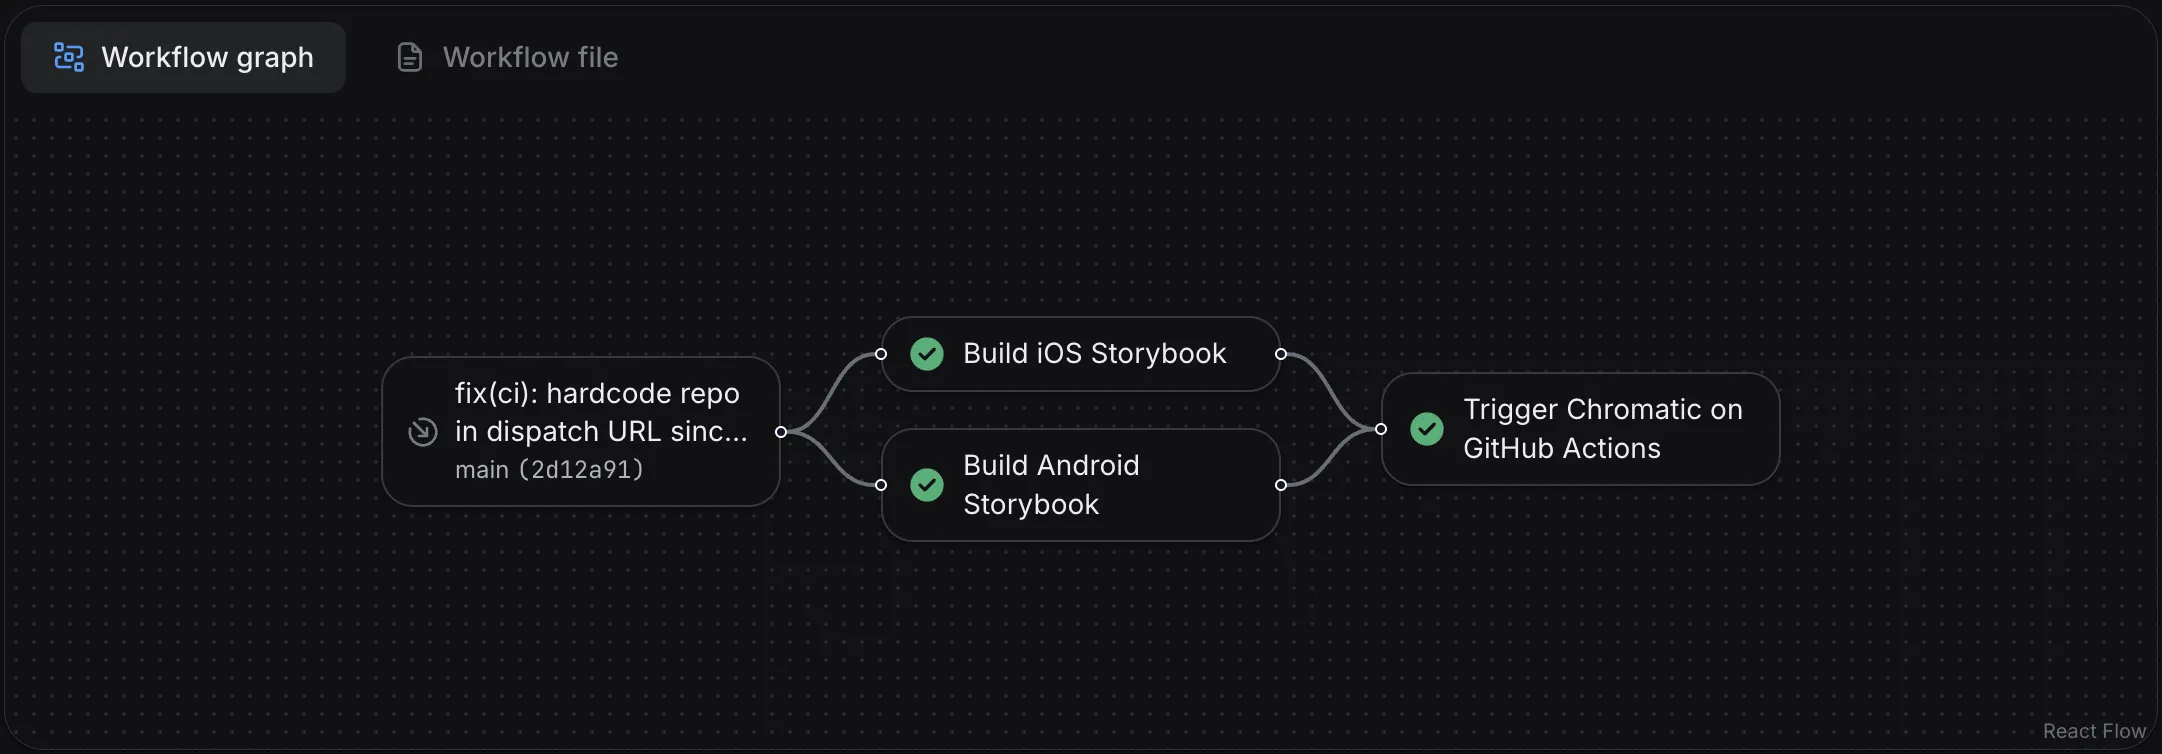
3. Run Chromatic on GitHub Actions
The dispatched workflow receives the two EAS build IDs, downloads the artifacts with the EAS CLI, arranges them into a storybook-static directory using the storybook.app / storybook.apk names Chromatic expects, and runs Chromatic with storybookBuildDir.
name: Chromatic (EAS artifacts)

on:
  workflow_dispatch:
    inputs:
      ios_build_id:
        description: 'EAS build ID for the iOS Storybook build'
        required: true
        type: string
      android_build_id:
        description: 'EAS build ID for the Android Storybook build'
        required: true
        type: string

jobs:
  chromatic:
    runs-on: ubuntu-latest
    steps:
      - name: Checkout
        uses: actions/checkout@v7
        with:
          fetch-depth: 0
      - name: Setup Node.js
        uses: actions/setup-node@v7
        with:
          node-version: 24.20.0
          cache: npm
      - name: Install dependencies
        run: npm ci
      - name: Download EAS build artifacts
        env:
          EXPO_TOKEN: ${{ secrets.EXPO_TOKEN }}
        run: |
          mkdir -p storybook-static
          IOS_PATH=$(npx eas-cli build:download --build-id "${{ inputs.ios_build_id }}" --non-interactive --json | jq -r '.path')
          cp -R "$IOS_PATH" storybook-static/storybook.app
          ANDROID_PATH=$(npx eas-cli build:download --build-id "${{ inputs.android_build_id }}" --non-interactive --json | jq -r '.path')
          cp "$ANDROID_PATH" storybook-static/storybook.apk
      - name: Run Chromatic
        uses: chromaui/action@latest
        with:
          projectToken: ${{ secrets.CHROMATIC_PROJECT_TOKEN }}
          storybookBuildDir: storybook-static
          exitZeroOnChanges: true
This workflow needs two secrets in your GitHub repository:
EXPO_TOKEN— an Expo access token so the EAS CLI can download your builds.CHROMATIC_PROJECT_TOKEN— your Chromatic project token.
Because the artifacts already contain both platforms, Chromatic skips the build step and snapshots directly from storybook.app and storybook.apk, just like the --storybook-build-dir flow above.
Frequently asked questions
Can I run only iOS or only Android?
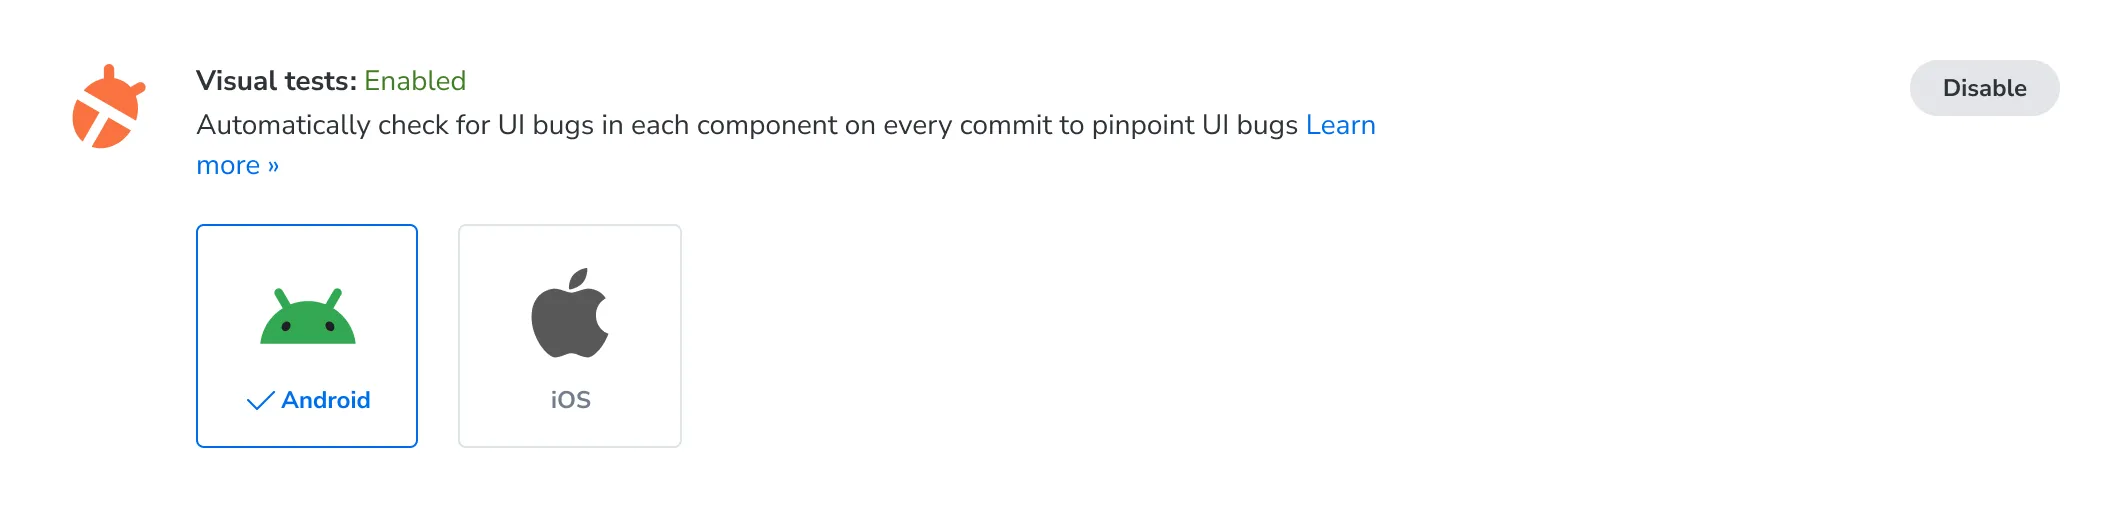
Yes. Toggle the platforms you want to capture on the project’s Configure screen in the Chromatic app.
Which iOS and Android OS versions does Chromatic use?
iOS: 26.1 and Android: 36
You can also view infrastructure details from the project’s Configure screen in the Chromatic app.

Do animations and Reanimated worklets work? How do I avoid inconsistent snapshots?
Yes. Animations driven by Reanimated and Worklets run normally during capture.
To stabilize a story whose initial frames are mid-animation, use the Storybook delay parameter.
How are custom fonts and static assets handled?
They’re bundled into the build itself. This is standard React Native behavior, fonts registered through expo-font, react-native-asset, or platform-native asset catalogs are part of the .app and .apk artifacts that Chromatic captures from. There’s no Chromatic-specific font configuration to manage.
Are dark mode, locale, and viewport modes supported in React Native?
Not yet via the modes API. You can write a separate story per variant, for example a LightMode story and a DarkMode story for the same component.
Is TurboSnap supported for React Native?
Not yet
Chromatic captures stories as rendered by the simulator, including the status bar—this can cause inconsistent rendering across devices. To avoid this, wrap your stories with a decorator that adds some padding or a safe area view, ensuring the UI elements stay visible, for example:
import type { Preview } from '@storybook/react-native';

import { View } from 'react-native';

const preview: Preview = {
  decorators: [
    (Story) => (
      <View style={{ padding: 44, flex: 1 }}>
        <Story />
      </View>
    ),
  ],
};

export default preview;